

Table of Contents
- Creative Pumpkin Carving Patterns for Beginners: Start Here
- Pumpkin Carving Tools for Beginners (Skip the Fancy Kit)
- How to Transfer a Paper Pattern onto a Pumpkin
- Step-by-Step: Carving Your First Jack-O'-Lantern
- Easy Pumpkin Carving Patterns and Designs for Beginners
- How to Preserve a Carved Pumpkin So It Lasts Past Halloween
- Pumpkin Carving for Kids: No-Knife Methods That Actually Work
- Troubleshooting Common Pumpkin Carving Mistakes
- Frequently Asked Questions
Last Updated: October 3, 2026
Creative Pumpkin Carving Patterns for Beginners: Start Here
Every October, millions of people scoop, stab and hope for the best. If you have ever stared at a blank pumpkin with a kitchen knife and mild panic, this guide is for you.
Pumpkin carving patterns are simply outlines you transfer onto a pumpkin before cutting, so your design looks intentional instead of accidental. You do not need talent, just a pattern, a few cheap tools and about an hour.
Pumpkin Carving Tools for Beginners (Skip the Fancy Kit)
You can carve a great pumpkin with three things: a serrated knife, a big spoon and a paper pattern. Fancy kits are nice, but beginners lose the tiny saws by November anyway.
Here is what actually earns its place on the table:
- Serrated knife for the lid and any large cuts
- Ice cream scoop or sturdy spoon for scooping pulp
- Printed paper pattern taped to the pumpkin
A quick note on the knife: shorter blades give you more control. A small serrated paring knife beats a giant chef's knife every time.
How to Transfer a Paper Pattern onto a Pumpkin
Transferring a pattern is the step beginners rush, and it decides whether your jack-o'-lantern looks like a cat or a crime scene.
The Tape-and-Poke Method
This is the method we recommend for every first-timer. Print your pumpkin carving patterns at the size you want, trim the excess paper, and tape the sheet flat against the pumpkin.
Then poke small holes along every line, about a quarter inch apart. Peel the paper off and you will see a dotted outline. Connect the dots with your knife.
Tracing and Freehand Options
If you do not want to poke holes, you have two other routes. Tracing: tape your pattern down, then rub a dull pencil or the back of a spoon along the lines so the paper leaves a faint mark.
Freehand is also the move with a permanent marker: draw directly on the pumpkin, carve along your lines, and wipe the marker off with a damp cloth.
Step-by-Step: Carving Your First Jack-O'-Lantern
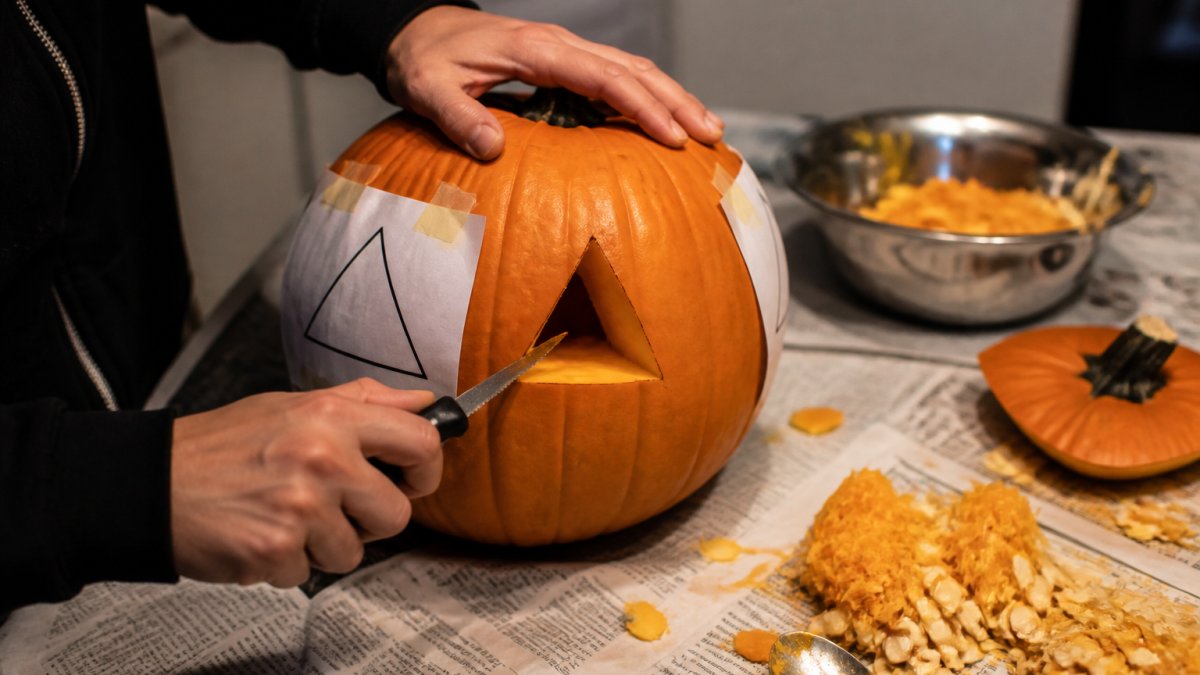
Here is the full process, start to finish. Budget about an hour.
- Cut the lid. Draw a hexagon around the stem, not a circle. Hexagons give you notches to line the lid back up. Angle the knife inward so the lid does not fall through.
- Scoop the insides. Pull out the pulp and seeds with your hands first, then scrape the walls with a spoon. Thin walls glow better; leave about an inch of flesh.
- Transfer your pattern. Tape and poke, trace or freehand, as covered above.
- Carve the small parts first. Do eyes and details before the big mouth. Small cuts are easier while the pumpkin is still sturdy.
- Push pieces out from the inside. Do not yank from the front. Gentle pressure from behind keeps edges clean.
- Clean up the edges. Run your knife along any ragged lines. Small fixes make a big difference.
- Light it up. Place an LED tea light inside, put the lid back on and dim the porch light.
Expected result: a recognizable face with clean edges and a warm glow. If it looks slightly lopsided, congratulations, it has character.
Easy Pumpkin Carving Patterns and Designs for Beginners
Simple, bold designs beat detailed ones for a first attempt. Thick lines and big shapes read clearly from the sidewalk, which is the whole point of a porch display; fine details disappear in the dark. Rule of thumb: if you cannot recognize the shape from ten feet away in daylight, it will not read at night either. Squint at your printed pattern before you commit.
Beginner-Friendly Stencils and Templates
Start with these shapes, all of which work as free printable stencils, ranked easiest to slightly-less-easiest:
- Classic triangle eyes and a jagged grin. The original, and still the most forgiving. Three triangles and a zigzag mouth, and you are done in fifteen minutes.
- A single big moon with a small bat silhouette. One large circle plus one small shape. Great first etch, since the moon can be shaved rather than cut.
- A cat face with pointed ears. Two triangles for ears, two almond eyes, a small nose. Reads well because the ears break the pumpkin's round outline.
Print these at whatever size fits your gourd, tape, poke and carve. Templates take the guesswork out, which is exactly what a beginner needs.
A sizing note most guides skip: a pattern covering roughly two-thirds of the pumpkin's face height looks best. Too small and it vanishes; too large and the walls get thin and start collapsing.
Carving vs. Etching: Which Technique to Try First
Carving means cutting all the way through the pumpkin wall. Etching means shaving only the outer skin so light glows through the flesh. Etching gives soft, spooky shading and is far more forgiving: a slip of the knife just adds texture instead of ruining the design.
Try carving first. It is more satisfying, and it teaches you how the pumpkin behaves. Then etch a second pumpkin for a layered display.
| Technique | What You Do | Difficulty | Best For |
|---|---|---|---|
| Carving | Cut through the wall | Easy | Bold faces, first attempts |
| Etching | Shave the outer skin | Easy | Soft glow, detailed scenes |
| Combined | Etch background, carve foreground | Medium | Layered, dramatic displays |
Three Designs That Look Impressive but Are Secretly Easy
The trick is not talent, it is picking patterns where the hard-looking part is actually a straight line or a single big shape.
- The silhouette scene. Cut one large shape (a tree, a cat, a bat) out of the center and leave the rest of the pumpkin intact. One cut, huge payoff.
- The negative-space face. Instead of cutting the eyes and mouth, cut around them. The face stays solid and the glow surrounds it. Fewer cuts, more drama.
- The drilled dot pattern. Skip the knife entirely for the design and use a drill bit or a sturdy skewer to punch a grid of holes. Polka dots, constellations and simple lettering all work. It is the least intimidating technique on this list and it photographs beautifully.
Where Your Carving Crew Comes In
Carving is a group activity, and groups have opinions. Someone wants scary, someone wants cute, someone wants to carve their own face and immediately regrets it. Lean in. Caltucky Creations makes funny graphic tees and cozy hoodies for exactly this kind of chaos, so the whole porch crew can match the energy while the pumpkin does the heavy lifting.
How to Preserve a Carved Pumpkin So It Lasts Past Halloween
A carved pumpkin starts wrinkling within days, and mold shows up fast once the inside is exposed to air.
First, scoop thoroughly. Leftover pulp is what rots first. Second, keep it cool during the day and bring it inside overnight if you can.
The old standby is a bleach solution: one part bleach to ten parts water in a spray bottle, misted on the carved surfaces and the inside.
Pumpkin Carving for Kids: No-Knife Methods That Actually Work
Toddlers and sharp knives do not mix, but kids still want in on the fun. Give them every step except the blade. Here is the version with actual age tiers and techniques, because "let them paint" only buys you about four minutes.
Age Tiers: What Each Kid Can Actually Do
- Ages 2 to 3: Scooping with hands, sticker placement, washable marker scribbles. Expect the pumpkin to end up more decorated than designed, and that is fine.
- Ages 4 to 6: Poking holes along a pattern with a plastic pushpin, painting with a brush, sticking on googly eyes and pipe cleaners. This is the sweet spot for non-knife methods.
- Ages 7 to 9: Tracing a pattern with a dull pencil, using a cookie cutter with adult help, and drilling holes with a skewer. They can own a real job here.
The Non-Knife Methods, Explained
Stickers and googly eyes. Peel-and-stick is the lowest-effort, highest-reward option.
Cookie cutters. The underrated one.
Pushpin poking. A plastic pushpin and a paper pattern is a real job a kid can own.
Drilling. A drill with a small bit turns a pumpkin into a dot-matrix canvas.
Marker drawing. Washable markers wipe right off, so kids can redraw as many times as they want.
Keeping Kids Busy While You Carve
The real challenge is not the kid's pumpkin, it is the adult's. Set the kids up with their own uncut pumpkin and a station of paint, stickers and markers before you pick up a knife. Give them a job that takes as long as your carve, scooping the second pumpkin, or sorting seeds for roasting.
Once the porch is glowing and the kids are sticky, the rest of Halloween is easy. Caltucky Creations makes funny graphic tees, cozy hoodies, scented candles and mugs for people who like their spooky season with a side of sarcasm. Grab a Halloween shirt for the carving crew, light a fall candle on the porch and let the pumpkin do the talking.
Troubleshooting Common Pumpkin Carving Mistakes
Most pumpkin problems have the same root cause: rushing the scoop or rushing the cut. Here is how to fix the classics.
- The lid fell inside. You cut straight down instead of angling inward. Fish it out, dry it, and rest it on toothpicks.
- A piece broke off. Push a toothpick through the broken piece into the pumpkin to pin it back. From the sidewalk, nobody will know.
- The design is unreadable. Your cuts were too small. Enlarge the eyes and mouth on your next pumpkin; bold always wins.
The throughline: slow down on the scoop, go bold on the design, and keep a toothpick nearby. That is the difference between a jack-o'-lantern and a sad orange puddle.
Frequently Asked Questions
What are some easy pumpkin carving patterns for beginners?
Start with bold, simple shapes: classic triangle eyes and a jagged mouth, a crescent moon, a ghost silhouette, or a cat face. These patterns need fewer cuts, which means fewer chances to slip. Free printable stencils make it even easier: tape the template to your pumpkin, poke holes along the outline, remove the paper, and carve. Skip intricate designs with thin bridges until you have a season or two of practice behind you.
What are the best pumpkin carving tools for beginners?
You need fewer tools than you think. A serrated knife handles the lid and big cuts, a sturdy spoon or ice cream scoop hollows out the pulp, and a thumbtack or nail pokes pattern holes. A carving kit adds safety saws and scoops, but a basic set from your kitchen drawer works fine for a first jack-o'-lantern. Add a bowl for seeds, newspaper for the mess, and a tea light or LED light for display.
How do you keep a carved pumpkin fresh for longer?
Moisture is both friend and enemy. After carving, soak the pumpkin in a bleach solution (about 1 teaspoon of bleach per gallon of water) for a few minutes, dry it thoroughly, and rub petroleum jelly or vegetable oil on the cut edges to slow drying. Keep it out of direct sun, bring it inside during warm days, and use an LED light instead of a real candle. Refrigeration overnight also adds days to its life.
What is the safest way to carve a pumpkin for beginners?
Cut on a stable, non-slip surface, keep your free hand away from the blade's path, and always carve away from your body. Use a serrated knife or a pumpkin saw rather than a chef's knife, and let kids draw the pattern while an adult handles the cutting. For younger children, skip knives entirely: paint, markers, stickers, and push-in plastic pegs let them decorate without any sharp tools.
Carving season is short, and the good designs go fast. Caltucky Creations has the funny Halloween tees, cozy hoodies, candles and mugs to make the whole month feel festive, whether you are carving a masterpiece or a very confident triangle. Our humor-first designs come on soft, quality basics that hold up wash after wash, and they make easy gifts for anyone with a sense of humor. Continue shopping with Caltucky Creations and let your porch, and your wardrobe, do the grinning this year.